The In-App Support Portal is a powerful new user interface designed to streamline customer support by enabling users to submit, track, and interact with support cases directly within S-Docs. This feature provides an intuitive, access-controlled experience that enhances the support process by allowing users to submit detailed cases, monitor status updates, and communicate with support representatives—all from one central interface.
Key features
Submit new cases with attachments
Users can easily create new support cases by providing essential details such as:
- Subject – A concise summary of the issue.
- Description – A brief explanation of the problem.
- Attachments – Users can upload screenshots and videos to provide additional context, which will be stored within the case on the S-Docs side.
Automated information collection
In addition to the collection of user-driven case information, the Support Request Interface automatically collects relevant information when a case is submitted. This includes:
- Customer Information - Org name, Org ID (instanceId), Instance URL
- User Information - First name, last name, email
- Date & Time of Submission – Ensures accurate logging for priority handling.
- Impacted Product – Identifies whether the issue is related to S-Docs or S-Sign.
- Package Version – Information about the package version being used.
- Case Comments – Logs user-submitted details and support team responses.
- Case Status – Tracks real-time updates on issue progress.
Track case progress
Once a case is submitted, users can track its status as it moves through the support escalation process. The interface provides real-time updates on:
- Current case status
- New
- Working
- Escalated
- Resolved
- Closed
- Support team responses
- Estimated resolution timelines (if applicable)
Direct communication with S-Docs Support
Customers can engage with the support team directly within the interface by adding comments to their cases. This eliminates the need for external email communications, ensuring faster and more efficient issue resolution.
Access control & security
The In-App Support Interface is designed with robust access control mechanisms to ensure that only authorized users can submit and track support cases. To account for this new responsibility, we’ve introduced a new permission set, S-Docs Support Admin. which can be assigned to the appropriate users in the organization responsible for case submissions.
In-App Support Portal
Getting Started
To begin using this feature:
- Navigate to the Support Requests Tab in the S-Docs App in your Salesforce environment.
- Click "Submit a New Case" and fill out the required details (Subject, Description).
- Attach relevant files (screenshots/videos) if needed.
- Click Submit to move the case into the Support queue.
- Track and update your case from the same interface.
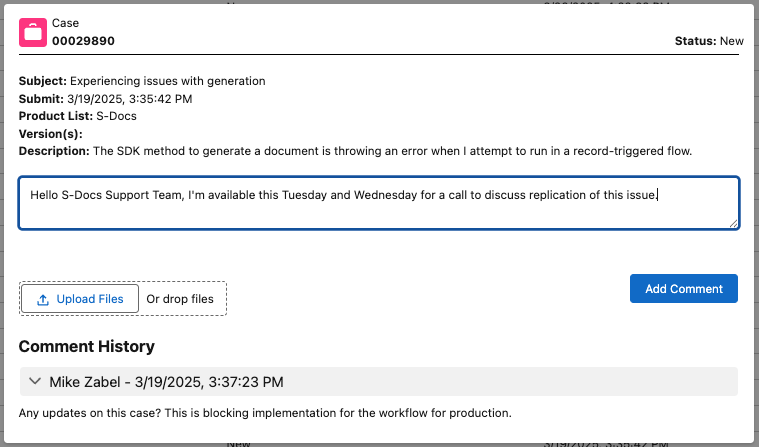
Viewing and Adding Comments to an Active Case
Once a case is created, quickly access its details by clicking on the case name or number in the list view. This opens a modal displaying the full case information, along with comment history and a text field for adding messages. By clicking Add Comment, you can communicate relevant updates (message and attachments) to the assigned S-Docs Support team member.
The In-App Support Portal enhances the user experience by providing a seamless, in-app solution that reduces friction in the support process. Automatic data collection and direct communication with the support team expedite case handling, ensuring faster issue resolution. Users benefit from improved case management, with full visibility into the progress of their support requests. Additionally, the centralized support interaction eliminates the need for external emails or phone calls, consolidating all support-related activities into one interface.
In‑App Help Menu with Interactive Tutorials
The In‑App Help experience in S‑Docs (v10.0+) provides direct access to a dynamic library of interactive, step‑by‑step tutorials that guide you through common tasks and feature overviews available in the S‑Docs and S-Sign managed packages.
This interface surfaces helpful resources right within Salesforce, enabling users to learn, troubleshoot, and complete processes without leaving their workflow. By surfacing these resources right where you work, you can quickly find answers, learn new functionality, and troubleshoot issues on your own — all without leaving Salesforce.
What’s Included
The In‑App Help menu connects you to a growing collection of tutorials that cover a wide range of S‑Docs topics. Each demo is built to walk you through a process interactively, ensuring you can follow along and apply what you’ve learned immediately.
Whether you’re creating templates, managing documents, or exploring advanced features, these tutorials are designed to meet you at your workflow and help you move forward with confidence.
How to Access the In‑App Help Menu
-
Launch the S‑Docs app in Salesforce.
-
Locate the S-Docs Help option in the S‑Docs navigation menu.
-
Browse or search through the available interactive tutorials.
-
Click to launch any tutorial to begin an on‑screen, step‑by‑step walkthrough.
Support Diagnostic Logger (SDL)
The Support Diagnostic Logger (SDL) is a companion tool for In-App Support designed to help the S-Docs Support team and org administrators quickly diagnose issues within S-Docs workflows. By logging key events during document generation processes, SDL provides detailed reports that aid in faster, more accurate troubleshooting for problems occurring within the S-Docs managed package.
To use the SDL, ensure proper permissions are assigned (S-Docs Support Admin) and navigate to the Support Diagnostics tab to launch the interface.
Click Start to initiate recording for the logger
Execute the full document generation workflow you wish to diagnose, then return to the SDL tab and click Stop to stop recording and finalize the log. If the Stop button is not clicked, the logger will run for a total of 15 minutes by default before shutting itself off.
Reviewing diagnostic logger files
Once the logging process is complete (i.e., clicking the Stop button), the generated S-Docs logger files will appear in the list view on the Support Diagnostics tab. If they do not appear immediately, click the Refresh button to populate the list.
Log files can be reviewed in two ways:
- View in-app: Click on a log filename to open a modal displaying the details of the individual log.
- Download for offline review: Select log files and click Download—log files are in plain text format and can be opened in any text editor.
Clear All removes all log files regardless of current selections in the list view. This option completely deletes the logger file from storage.