With the Spring '25 release (v9.0), S-Docs expands support for eSignature automation through invocable actions in Salesforce Flows. You can now build seamless workflows that generate documents, prepare and seal signature envelopes, and send signature requests—all without leaving Flow Builder.
Learn how to generate documents for signature requests with the invocable action library for Flow Builder.
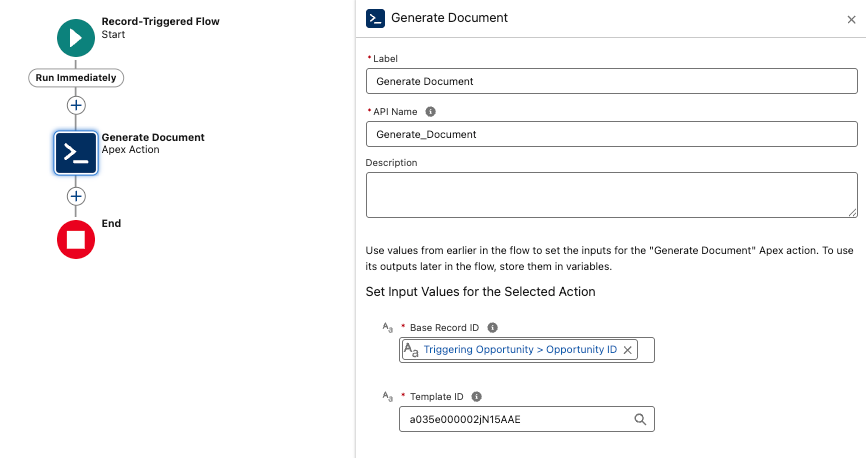
Step 1: Generate a PDF document
To begin, add the Generate Document invocable action from the S-Docs actions library to your Flow.
Required Inputs:
-
Base Record ID: The record that the document is related to
-
Template ID: The ID of the S-Docs template used to generate the PDF
This action will output the generated S-Doc record, which you’ll reference in later steps.
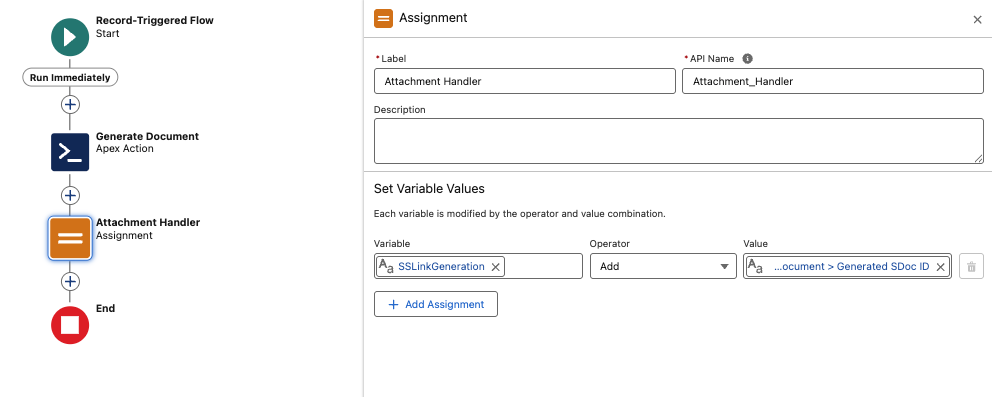
Step 2: Create an assignment variable
Next, add an Assignment element to store the generated document for email delivery.
In the Assignment element, click + New Resource:
Configure the resource as follows:
-
-
Resource Type: Variable
-
API Name: SSLinkGeneration (or any unique name)
-
Data Type: Text
-
Allow multiple values (collection): Checked
-
Under Set Variable Values, configure:
-
-
Variable: SSLinkGeneration
-
Operator: Add
-
Value: Outputs from Generate Document > Generated S-Doc
-
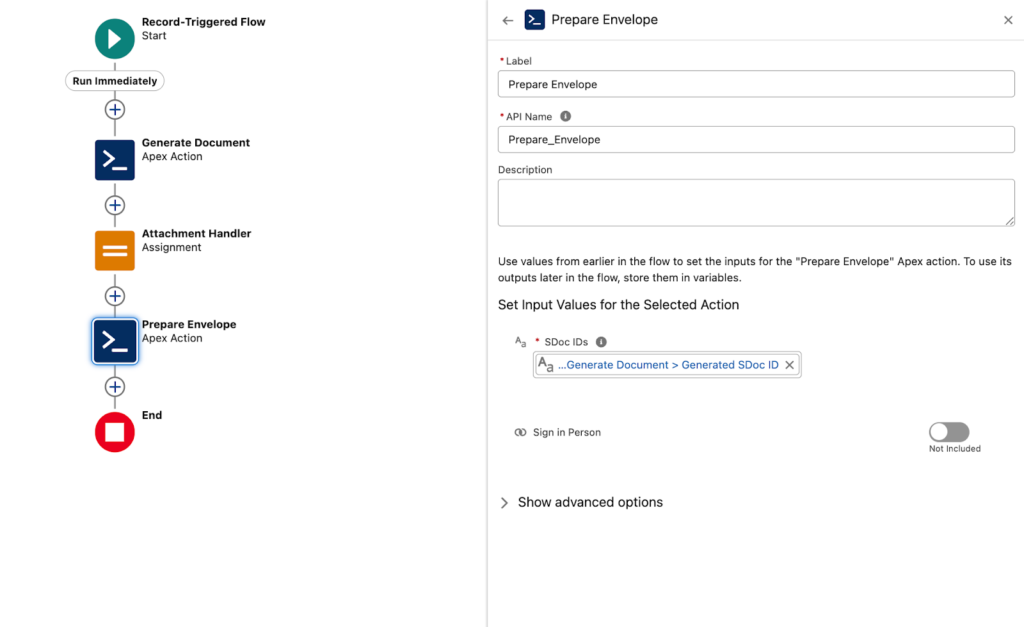
Step 3: Prepare the signature envelope
Now, add the Prepare Envelope invocable action to associate the generated document(s) with a new envelope.
Inputs:
-
S-Doc ID: Outputs from Generate Document > Generated S-Doc
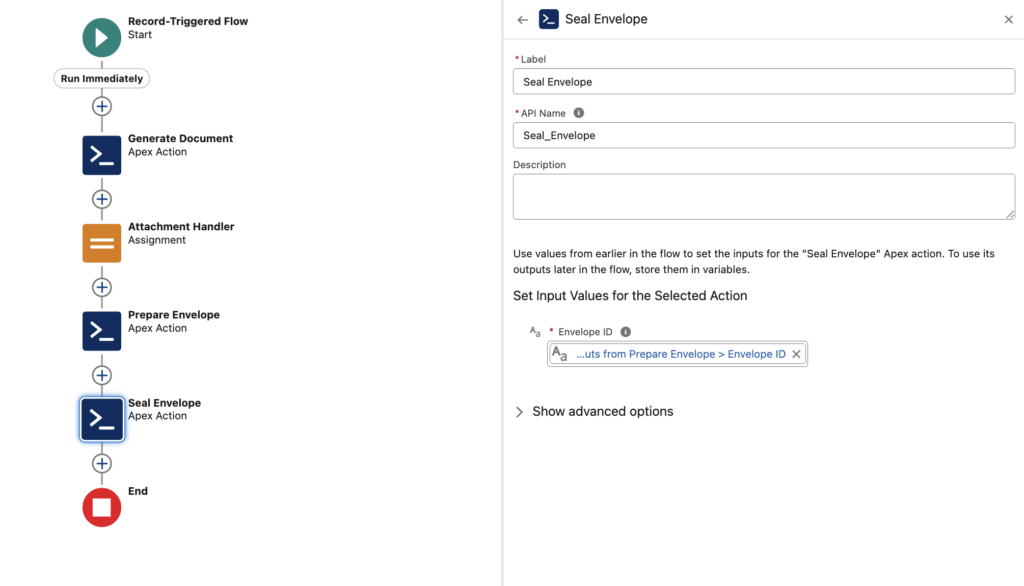
Step 4: Seal the signature envelope
The Seal Envelope action locks the envelope and ensures only designated recipients can access the signing request.
Inputs:
-
Envelope ID: Outputs from Prepare Envelope > Envelope ID
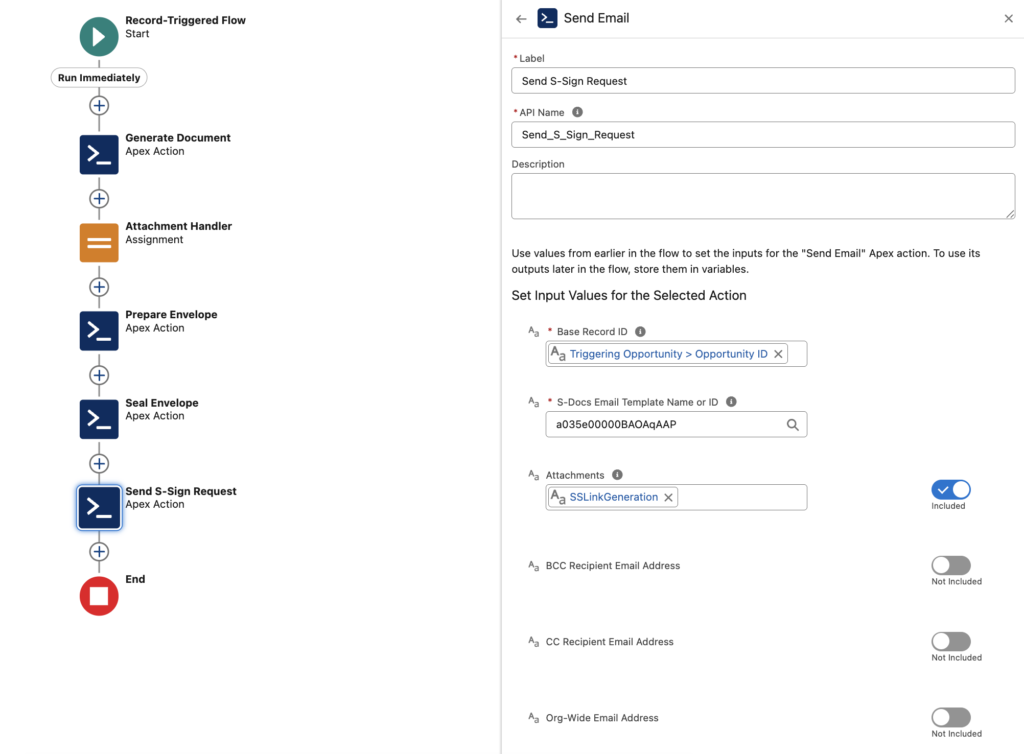
Step 5: Send the signature request
Finally, use the Send Email invocable action to deliver the request to your signers.
Inputs:
-
Base Record ID: ID of the related record (e.g., Opportunity ID)
-
Email Template Name or ID: S-Sign-enabled HTML template
-
Attachments: Included
-
Value: SSLinkGeneration (variable created in Step 2)
-
Configuration quick reference
Set up the flow
- Launch the Flow builder in Salesforce Setup and click New Flow. Select Start From Scratch and click Next.
- Select Screen Flow.
- Then, click Create.
- In the flow builder interface, click the plus sign (+) to add a new element to the flow.
- Select Get Records.
- For this example, the flow will be configured to gather Opportunity records that will be displayed in a screen element.
- Click the plus sign (+) to add the next element.
- Select Screen.
- Since the flow will be gathering opportunities, let's name it Opportunities List.
- Configure header visibility (this is optional) and configure the footer to include a descriptive primary call to action for what the Flow will execute.
- Add an input element to the screen — drag and drop the Data Table element onto the screen builder.
- Configure the Source Collection for the data table to populate with the Opportunity records gathered from the Get Screen Component in the first step of the flow.
- Lastly, ensure that at least one column variable is included for the table. For this flow, we'll use Opportunity Name.
Click Done.
Add the new element to your Flow
- In the flow builder interface, click the plus sign (+) to add a new element to the flow.
- Select Action.
- Search for S-Docs in the right sidebar, then select the S-Docs folder.
- Select the Generate Document action.
- Configure the action:
- Give it a descriptive name
- Define Base Record ID as the item selected from the data table setup in the screen flow
- Add the S-Docs Template ID
- In the flow builder interface, click the plus sign (+) to add a new element to the flow.
- Select Assignment.
- Name the assignment element Attachment Handler and create a New Resource for the variable input.
- Configure the new resource:
- Select Variable for Resource Type
- Set API Name to Sign_Link
- Select Text for the Data Type
- Check Allow Multiple Values (collection)
Click Done.
Add e-Signature Flow steps
Prepare envelope
- In the flow builder interface, click the plus sign (+) to add a new element to the flow.
- Select Action.
- Search for S-Docs, then select the S-Docs folder.
- Select Prepare Envelope.
- Configure the action:
- Give it a descriptive name
- Add the Output from the Generate PDFs action (S-Doc ID) for the selected Opportunity ID as the input value for the SDocs ID Field
Expand the Show Advanced Options menu and select the Always Start a New Transaction option.
Seal envelope
- In the flow builder interface, click the plus sign (+) to add a new element to the flow.
- Select Action.
- Search for S-Docs, then select the S-Docs folder.
- Select Seal Envelope.
- Configure the action:
- Give it a descriptive name
- Add the Output from the Prepare Envelop action > Envelope ID as the input value for the Envelope ID Field
- Check Always start a new transaction in the Advanced options menu
Send email
- In the flow builder interface, click the plus sign (+) to add a new element to the flow.
- Select Action.
- Search for S-Docs, then select the S-Docs folder.
- Select Send Email.
- Configure the action:
- Give it a descriptive name
- Add the Output from the Generate PDFs action (S-Doc ID) for the selected Opportunity ID as the input value for the Base Record ID Field
- Add the S-Sign Enabled Email Template ID
- Toggle the Attachments field to included
- Add the Sign_Link variable created earlier in the flow to the Attachments input field
Click Save.
Then, Activate the flow.